InDesign's Print Booklet feature makes this look like a one-click fix. In practice, results depend heavily on your page count, the booklet type you choose, binding settings, and how you handle blank pages. Get one of those wrong and you'll waste paper on a test print, or worse, discover the error after a full run comes back from the printer.
This guide walks through the exact steps for imposing a booklet in InDesign, what to prepare beforehand, which settings actually affect your output, and the mistakes people make most often. We'll also cover when it makes more sense to hand the job to a professional print shop instead of troubleshooting creep settings yourself.
TL;DR
- File > Print Booklet converts sequential pages into printer spreads, without altering your InDesign file
- Match your booklet type (Saddle Stitch, Perfect Bound, or Consecutive) to your binding method
- Keep page count a multiple of 4; add blanks or enable Print Blank Pages
- Creep, Space Between Pages, and Signature Size affect fold alignment and spine appearance
- For high-volume jobs, partner with Minuteman Press to save time and avoid costly reprints
How to Impose Documents for Booklet Printing in InDesign
Step 1: Prepare the Document Before Imposing
Before you touch the Print Booklet dialog, get your file in order. Three checks matter most:
- Single page size - Print Booklet won't impose mixed page sizes, per Adobe's imposition documentation. Resize oversized inserts to match the rest of the document.
- Multiple-of-4 page count - Every printed sheet holds four page faces, two per side once folded. A 22-page booklet needs two blanks added to reach 24.
- Binding direction - Open File > Document Setup and confirm whether binding is left-to-right or right-to-left. This flips how InDesign arranges printer spreads.
Add blank pages manually if you're short, and drop a text frame or shape onto each one. A page with zero objects can get dropped or reflowed during imposition.
Step 2: Open Print Booklet and Choose a Booklet Type
With prep done, go to File > Print Booklet. This opens InDesign's imposition dialog, separate from the regular Print dialog.
From here:
- Select a saved Print Preset, or choose Current Document Settings to carry over your existing setup
- Pick the booklet type that matches your physical binding method
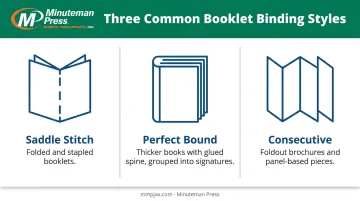
| Booklet Type | Best For |
|---|---|
| 2-up Saddle Stitch | Folded and stapled booklets |
| 2-up Perfect Bound | Thicker books with a glued spine, grouped into signatures |
| Consecutive | Foldout brochures and panel-based pieces |
Adobe's booklet types documentation confirms each type produces a genuinely different page arrangement, not a cosmetic variation. Pick the wrong one and your folded sheets simply won't read in order.
Step 3: Set the Page Range and Print Settings
Next, define what gets imposed:
- Use a hyphen for consecutive pages (
3-7) and commas for non-adjacent ranges (3-7, 16) - Click Print Settings to adjust printer's marks, bleed, and color output
- If you manually added blank pages in Step 1, enable Print Blank Pages inside Print Settings, or InDesign will drop them
Don't confuse this with Print Blank Printer Spreads, a separate control governing blank spreads InDesign generates automatically at the end of a booklet. Mixing the two up is one of the more common reasons blank pages vanish or reappear where you didn't want them.
Step 4: Configure Spacing, Preview, and Print
The Setup area is where fold accuracy actually gets decided:
- Space Between Pages - the gap between pages in a spread (not adjustable for Saddle Stitch)
- Bleed Between Pages - lets artwork cross the spine gap, available for Perfect Bound only
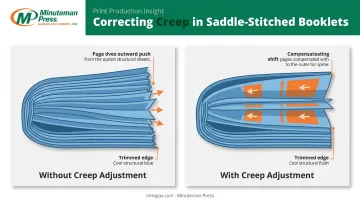
- Creep - shifts content to compensate for paper thickness pushing inner pages outward
- Signature Size - how many pages get grouped into each folded section for Perfect Bound jobs
Adjust these based on your paper stock and binding method, then scroll through the Preview panel to confirm pages land in the correct fold order. Check the Summary tab too. It flags setting conflicts before you commit anything to paper.
Once everything checks out, click Print to send the job to your printer, or export a print-ready PDF if you're handing production off to a print shop. Minuteman Press in Jacksonville handles booklet imposition, printing, and binding in-house for customers who'd rather skip this setup altogether.
When and What You Need Before Imposing a Booklet
Manual imposition in InDesign works best in specific conditions, not every project.
Good fit for DIY imposition:
- Saddle-stitched booklets, programs, or catalogs
- A single, consistent page size throughout
- A page count your in-house printer can realistically handle
Not a good fit:
- Large print runs where a single mistake means expensive reprints
- Multi-section, multi-signature books
- Documents mixing multiple page sizes
For projects like these, Minuteman Press's in-house production team handles imposition and printing to avoid that costly risk.
Before opening Print Booklet, confirm you have three things ready:
- A printer or RIP capable of two-sided printing, or a manual duplex workaround
- A finalized page count divisible by 4
- Bleed and margins already set correctly in the layout, not something to fix after imposing
Skipping any of these doesn't just cause a cosmetic issue. It usually means starting the process over after wasting paper on a test print.
Key Parameters That Affect Results When Imposing Booklets
Four settings determine whether your booklet folds cleanly or falls apart at the bindery.
Booklet Type
Your choice of Saddle Stitch, Perfect Bound, or Consecutive determines how spreads are arranged and which spacing options even become available. Choose the wrong type for your binding method, and you'll get spreads that physically can't be folded correctly.
Creep
Paper has thickness. On a saddle-stitched booklet with more than a few sheets, inner pages push outward once folded, a phenomenon Adobe explains in its creep settings guide. Skip creep on a thicker booklet and inner pages look shifted or get trimmed unevenly.
Space Between Pages and Bleed Between Pages
These control the spine gap on Perfect Bound spreads, plus any artwork crossing it. Get the values wrong and you'll see visible white gaps or misaligned crossover images right at the spine, exactly where readers notice first.
Signature Size
This sets how many pages get grouped into each folded section for Perfect Bound work. A mismatched signature size adds unnecessary blank pages and complicates binding down the line.
| Parameter | Why It Matters | Risk If Ignored |
|---|---|---|
| Booklet Type | Determines spread arrangement and spacing options | Spreads that can't fold or bind correctly |
| Creep | Compensates for paper thickness during folding | Shifted or unevenly trimmed inner pages |
| Space/Bleed Between Pages | Controls spine gap and crossover artwork | Visible gaps or misaligned images at spine |
| Signature Size | Groups pages into Perfect Bound sections | Extra blanks, complicated binding |
Common Mistakes and Troubleshooting When Imposing Booklets
Most imposition failures trace back to a handful of repeat offenders:
- Skipping the multiple-of-4 page count check, which forces InDesign to auto-insert unwanted blanks
- Forgetting to enable Print Blank Pages, so intentionally added blank pages get dropped
- Selecting the wrong booklet type for the intended binding method
None of these show up until you fold a proof, which is exactly why a physical test print matters more than an on-screen PDF check. Here's how to diagnose the three most common symptoms once they surface:
Pages Print Out of Order After Folding
Likely cause: Incorrect booklet type selected, or a mismatched Binding direction in Document Setup.
What to check: Confirm the booklet type matches your physical binding, then verify the Binding setting under File > Document Setup.
Manually Added Blank Pages Disappear
Likely cause: InDesign didn't recognize the pages as intentional because they had no visible content.
What to check: Add a text frame or placeholder shape to each blank page, or enable Print Blank Pages in Print Settings.
Double-Sided Pages Misaligned Front-to-Back
Likely cause: Your printer lacks duplex support, or the wrong edge-binding option was selected.
What to check: Use the Odd Pages Only / Even Pages Only workaround, and confirm Short-Edge vs. Long-Edge binding matches your booklet type in the printer driver.
Alternatives and Final Recommendations
Manual imposition isn't always the most efficient path, especially once a project grows beyond a simple stapled booklet. Two alternatives are worth considering:
| Alternative | Better For | Trade-off |
|---|---|---|
| Automated imposition plug-ins or scripts | High page-count projects or jobs mixing multiple binding types | Added setup time and a learning curve versus InDesign's built-in feature |
| Exporting a print-ready PDF to a commercial print provider | Large print runs, tight deadlines, or jobs where a costly reprint is a real risk | Less hands-on control over spacing and layout once the file leaves your desktop |
If you'd rather skip troubleshooting creep, signature size, and blank-page settings altogether, that's where a full-service shop earns its keep. Minuteman Press in Jacksonville handles booklet and catalog printing and binding in-house, and our team can walk through your file before it hits a press.
Call 904-733-5578, request an estimate online, or send your file directly through our upload portal.
Successful imposition comes down to three things set correctly from the start: page count, booklet type, and creep. Most failures trace back to skipped preparation, not a flaw in the software itself.
Frequently Asked Questions
What is the difference between a printer spread and a layout spread in InDesign?
A layout spread shows your pages in normal reading order, exactly as designed. A printer spread rearranges those pages, page 2 next to page 7, for example, so they read correctly once folded and collated.
Why does InDesign say I can't create a new document from imposed pages?
Print Booklet only handles imposition within the print stream. It can produce a printed output or a PDF, but it can't generate a new InDesign file from the imposed layout.
How do I print a double-sided booklet without a duplex printer?
Use Odd Pages Only in Print Settings, print that batch, then flip and reload the paper and print with Even Pages Only. It takes an extra step but works reliably.
Why does my page count need to be a multiple of 4 for a booklet?
Each printed sheet holds four page faces, two per side, once folded. Any count not divisible by 4 forces InDesign to add blank pages to complete the last sheet.
Should I choose Saddle Stitch or Perfect Bound for my booklet?
Saddle Stitch suits stapled, folded booklets of moderate thickness. Perfect Bound suits thicker books that need a glued, trimmed spine divided into signatures.
Can I impose a document that has mixed page sizes in InDesign?
No. Print Booklet does not support mixed page sizes, so resize every page to match before attempting to impose the document.
Visit Us in Jacksonville
Minuteman Press Jacksonville handles booklet imposition, printing, and binding in-house for customers who want to skip the InDesign setup process and get a professionally finished piece without troubleshooting creep settings or blank-page issues. Call 904-733-5578 or visit 4185 Sunbeam Road, Suite 100, Jacksonville, Florida 32257 to hand your file to a team that takes it from there.